Projects
Challenge:
For the person that has everything, but needs something to carry it in….
You will make a small tote, to carry your tools, stationary, gardening supplies, or anything else. The design (end shape) should reflect the objects going inside the tote.
Once you master this simple first tote, you will begin to see many ways to improve your next versions to better suit the objects being carried.

Inspiration
Inspiration:
A simple Google Image search will give you hundred of ideas - search “wooden tool tote“
First 1 minute, 48 seconds shows lots of different tool totes. YouTube Link
Learning
The purpose of this project is to develop skills and knowledge using hand and power tools to create and assemble a wooden product. The design of the end panels should reflect the use of the tote tray. Presentation: You will present your self-evaluation to your teacher. Your project may be put on display within the school and photographed for the school website.
CTF Curriculum Outcomes
2. I use occupational area skills, knowledge and technologies.
3. I follow safety requirements associated with occupational areas and related technologies.
9. I create products, performances or services in response to challenges.
10. I appraise the skills, knowledge and technologies used to respond to challenges.
Learning (*requires Tool License)
Hand tools (metric measuring, files, file card, sanding blocks/paper)
Power tools (hand drill*, drill press*, band saw*, spindle sander*, disc/belt sander*)
Wood (material)
Use metric measurements for layout
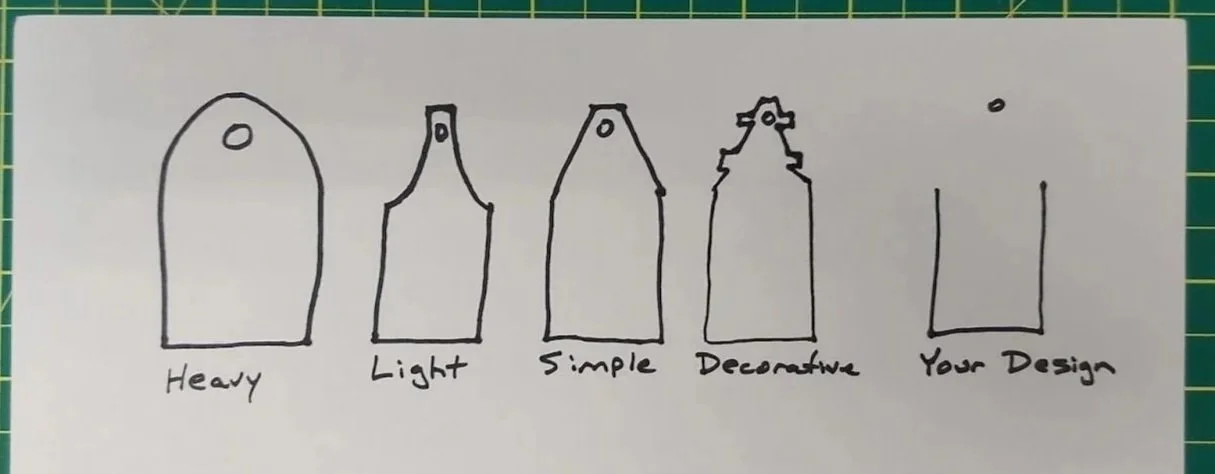
Student chooses shape/outline of ends. Design: End pieces should be designed to complement the use of the tote tray
Questions (to ask when assessing project with student - relate to CTF outcomes)
What will you be putting in your tote?
Why did you pick the shape of the sides that you made?
What did you do right when making this project?
Ways to improve Mr. Wright’s example. (Sample of what would be discussed if Mr. Wright presented the tote tray for assessment.)
When drilling the holes for the sides, the wood splintered out.
How could this be fixed next time?
Clamp the side to the scrap wood tighter so the back side does not splinter out.
Drill from the front (side that shows) to the back (that is glued to the end or bottom piece so any splinters are hidden).
[Plans have been revised to prevent this problem for students in the future.]
The sides are slightly longer than the bottom.
How can this be fixed?
I could, now that the tote tray is finished, I could sand/file the ends even so it looks better.
The handle is off-center.
Why did this happen?
I erased my center line before I drilled the hole for the handle. (Skipped ahead and did the steps out of order.) So I had to try to locate the center line after I had cut the end shape on the bandsaw.
Instructions
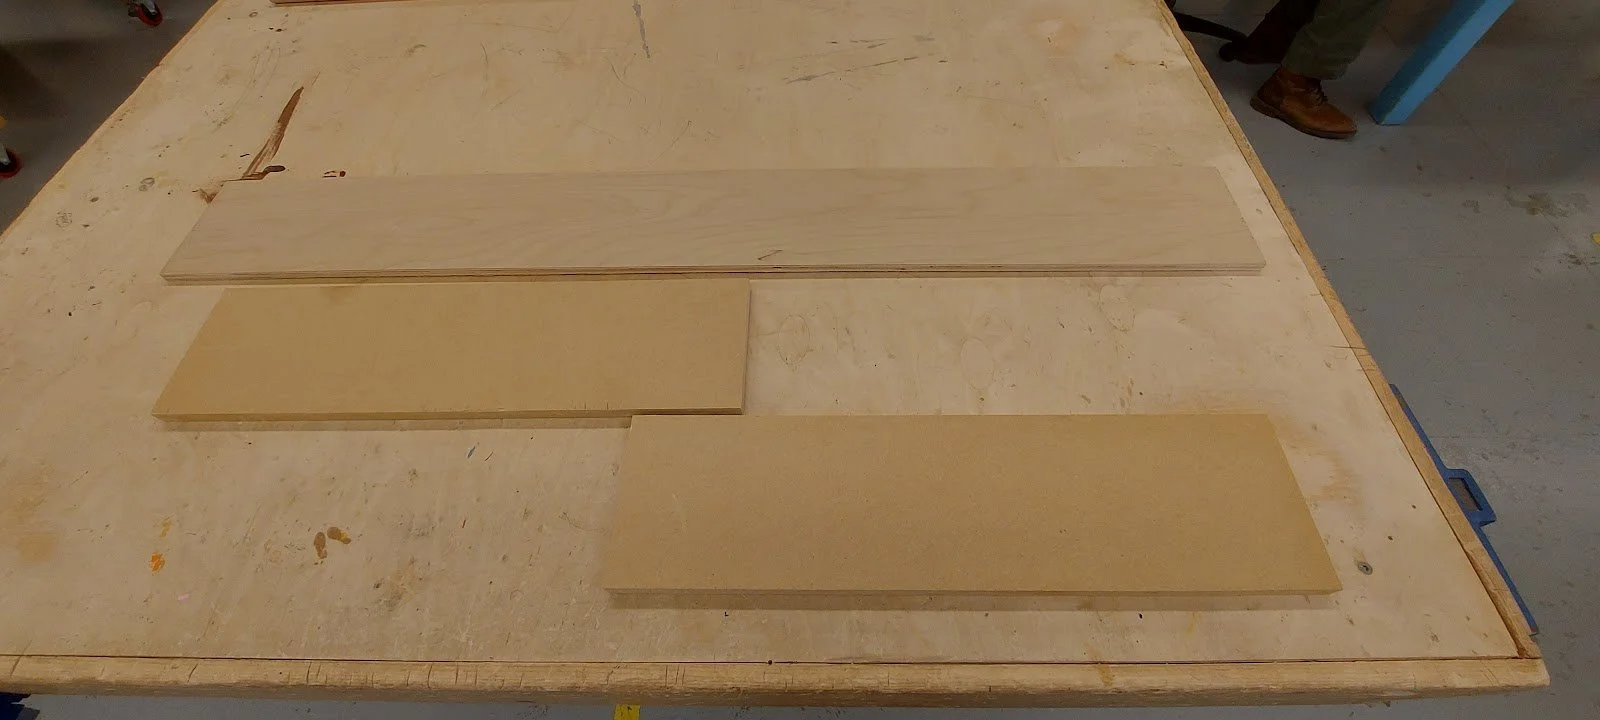
Pieces ready to start.
Step 1 - Ends
CAUTION: In this first step, the photos may show marks with a felt pen to make the lines easier to see in the photo. All lines on wood are to be drawn with a sharp pencil. (In this example the ink soaks into the wood and leaves permanent marks - so it is only marked with a felt pen to make it easier to read.)
Using the ¾ solid stock piece that is about 50 cm long - you will cut the piece into two equal length pieces.
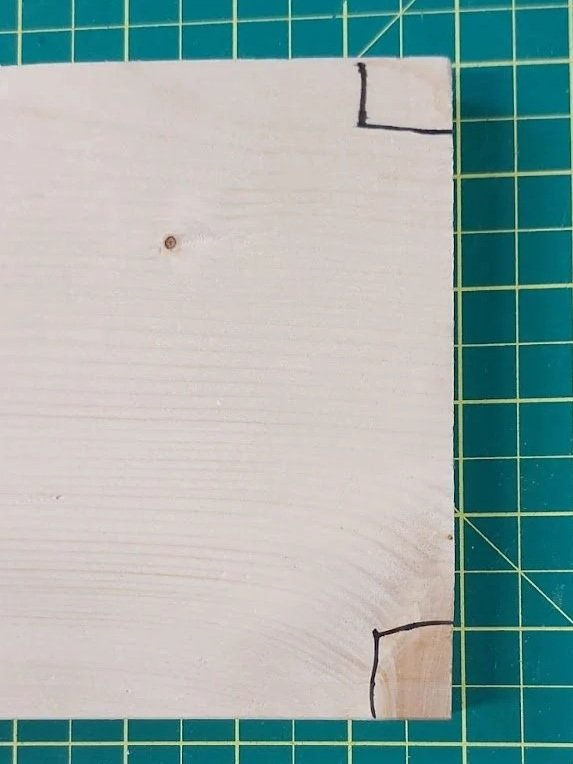
Draw the right angle symbol in the corners of the board (so you know which corners are square later during assembly).
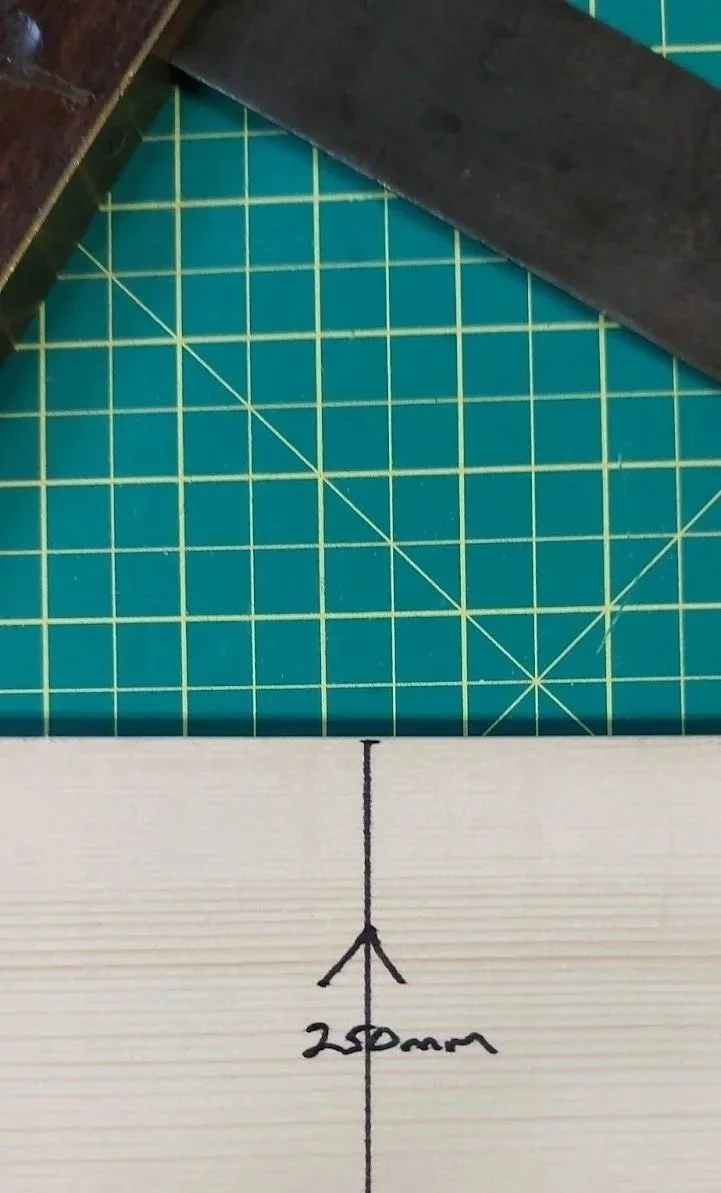
Measure _(Your number)_ mm from one end of the board - make a small mark with a sharp pencil. (Draw one line from the measurement to the left on an angle, and another from the measurement to the right - so you know the measurement is at the point of the ‘V’ you just drew.)
Use a square to draw a line across the board - be sure to hold the square tight against the side of the board so the line is square. (Square means the cut is 90 degrees to the other sides.)
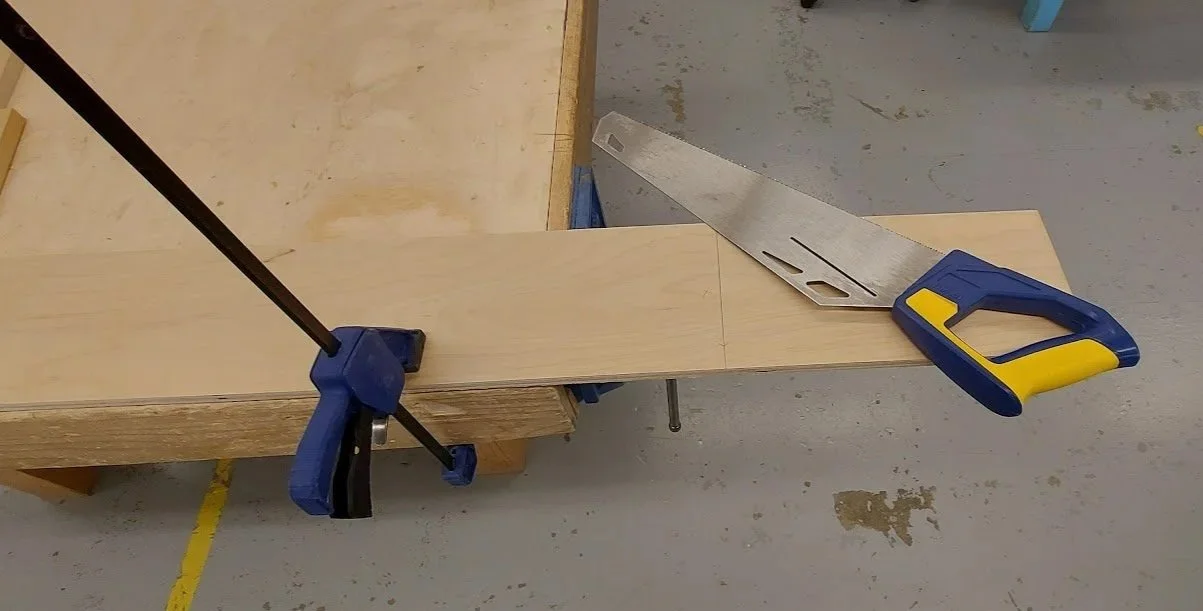
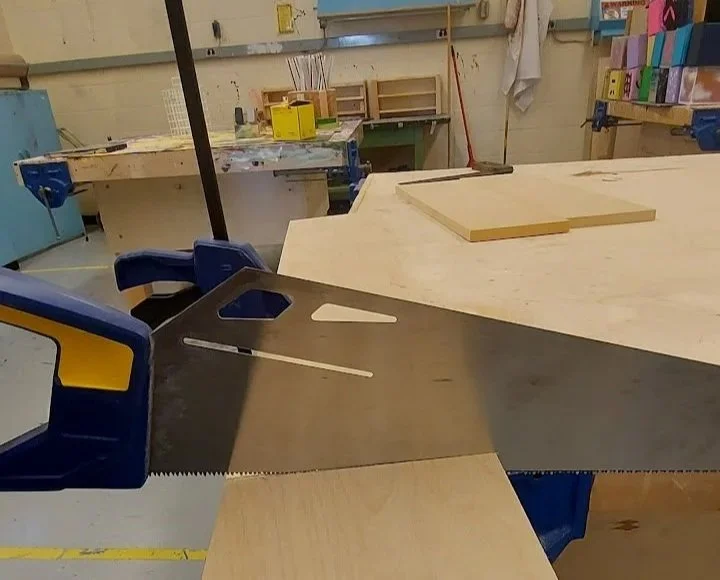
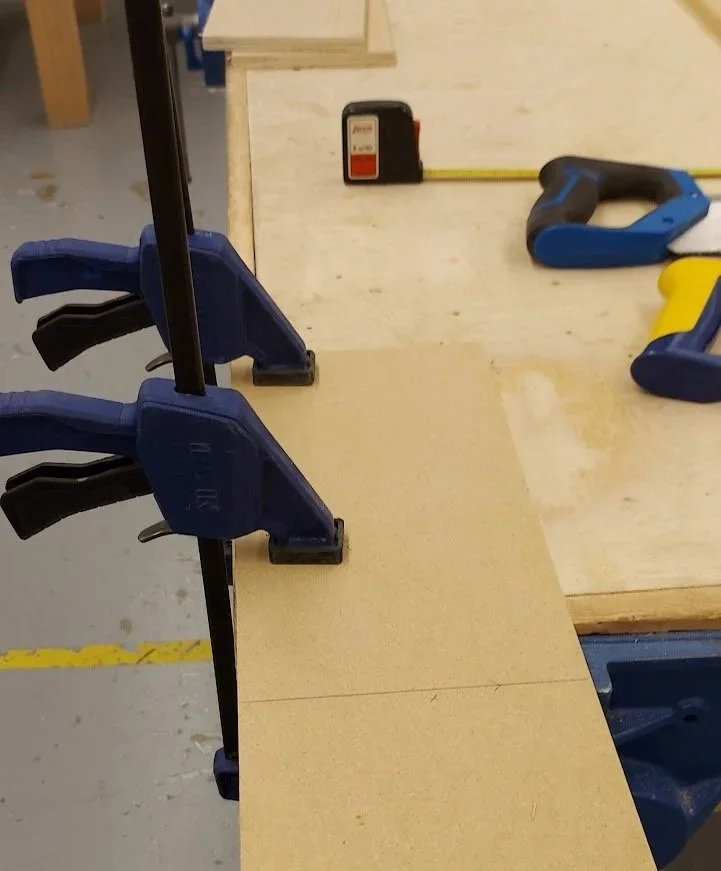
Clamp the piece to the bench with two clamps, making sure there is space to cut the on the line.
When cutting two pieces, your saw will be on the center of the line. (As you are making both pieces the same size.)
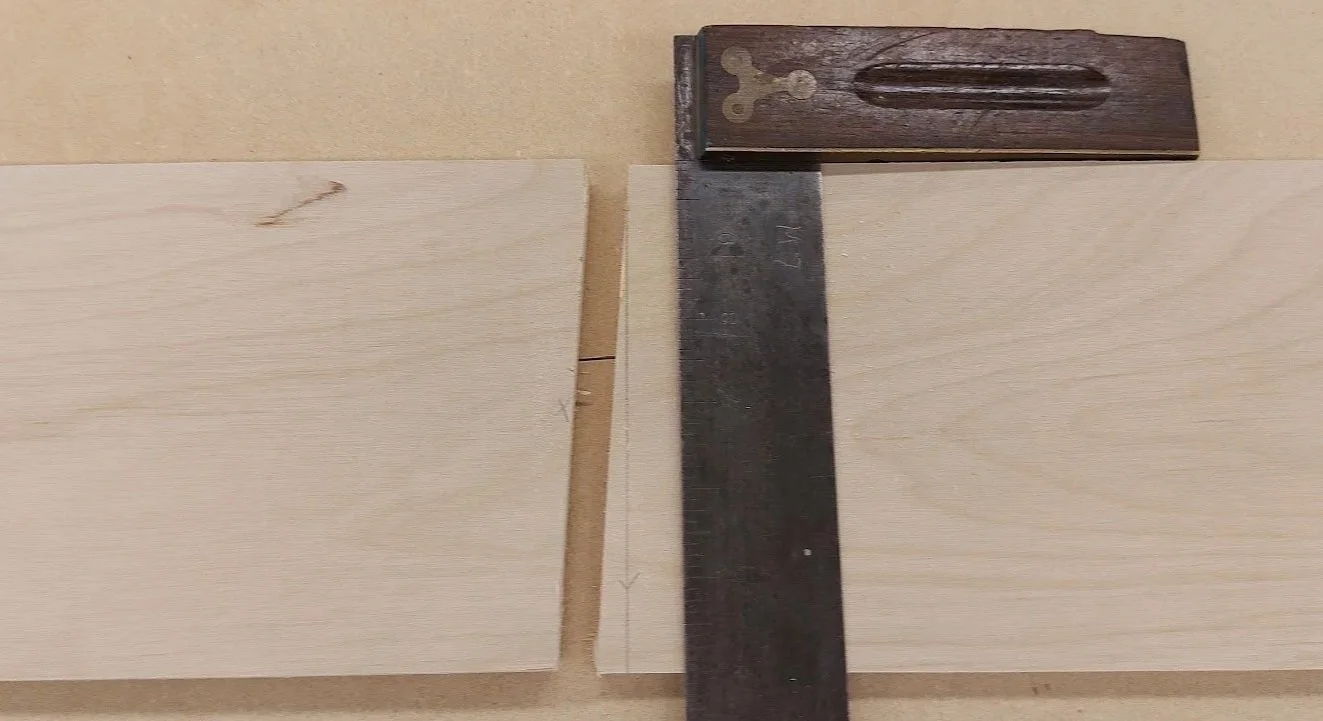
Once the two pieces are cut, put the boards together to see how close you are to making them equal length. (Did you make them the same size?)
Compare the ends to see how square you made your cut.
Print your name (using a pencil) on both pieces.
Show your two ends to your teacher to receive your next piece of wood for the bottom.
Step 2 - Bottom
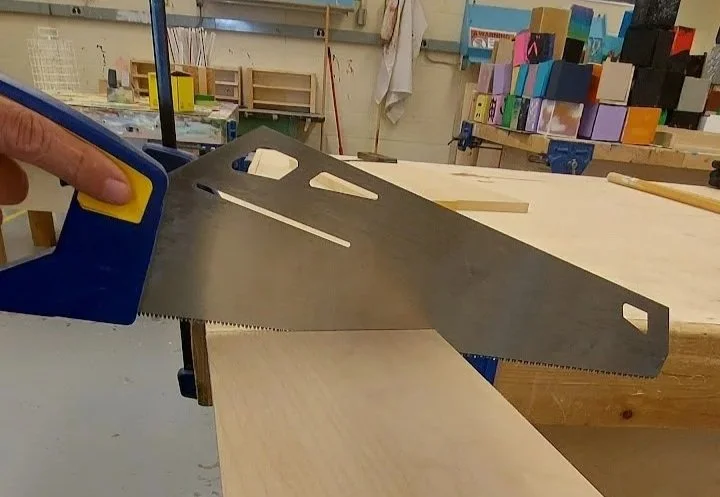
Using the ¾ solid stock piece that is about 30 cm long, cut the length to 30 cm with a square cut. (Square means the cut is 90 degrees to the other sides.)
Measure 30 cm from one end of the board - make a small mark with a sharp pencil. Pencil mark under the 30 cm measurement. (draw two lines from the 30 cm mark to form a V so the tip of the V is exactly at 30 cm).
Use a square to draw a line across the board - be sure to hold the square tight against the side of the board so the line is square.
Put an X (or swiggle) on the waste side (the non 30 cm length) to show which side of the line you should cut on (put the saw on).
Clamp the work to the bench, and using a panel saw (or back saw) cut on the outside (waste side) of the line.
(I find I cut straighter if I keep my pointer finger pointed along the line.)
Print your name on the bottom piece with a pencil and show to your teacher.
Intentional Mistake
If you cut on an angle (not square) do not worry.
Always cut on the waste side, so this could be corrected by sanding, filing, or cutting more off.
Remember, you can never add more wood back on -
so it is always better to leave a little bit extra to trim off later.
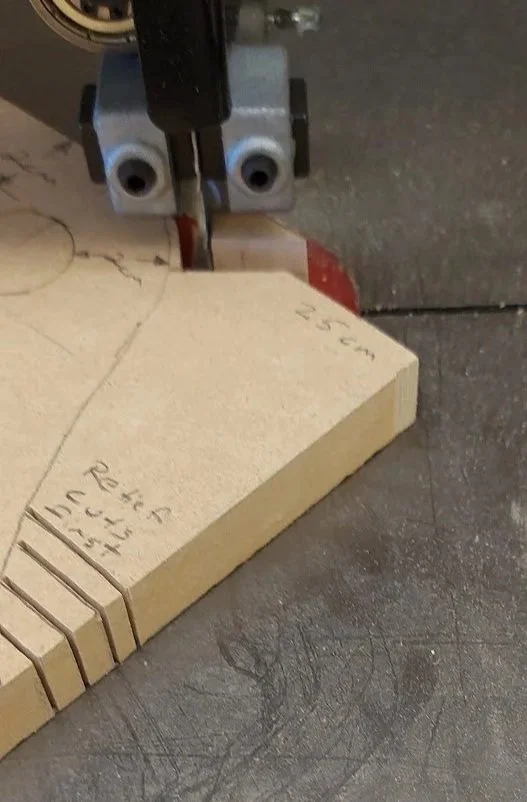
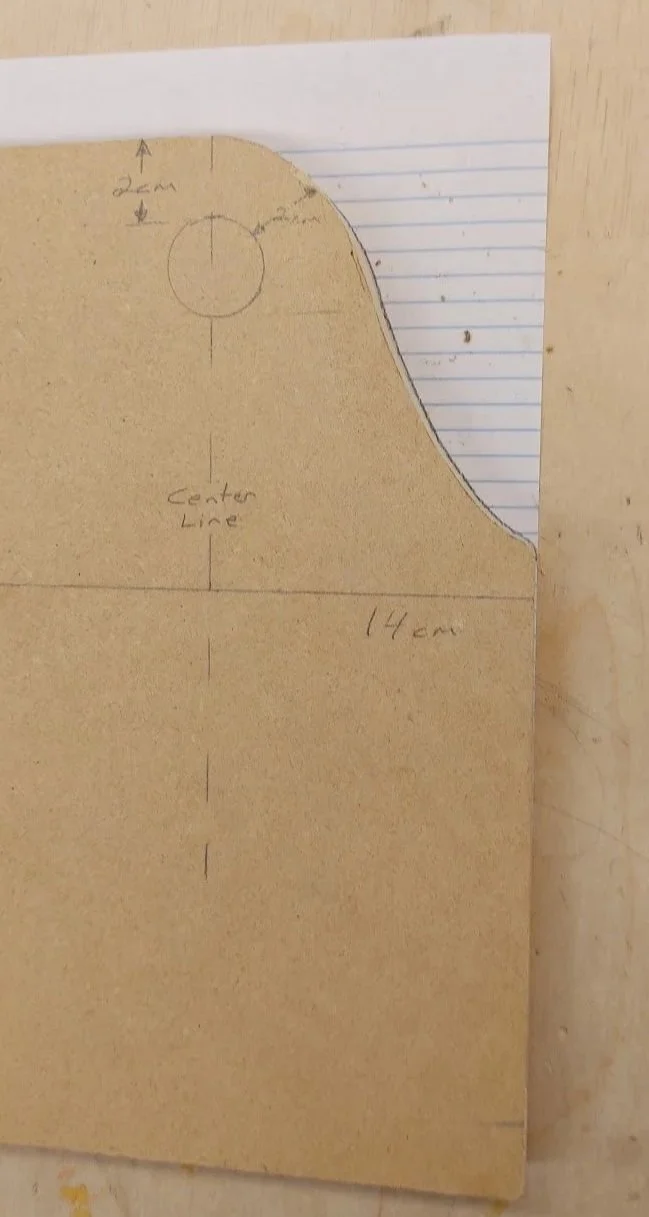
Measure up from the bottom to where the top of the side is. (You can NOT cut the end piece any lower than the sides.) Mine side was 14 cm, so the lowest point I can cut the end piece is 14 cm from the bottom.
Using a measuring tape and square draw a line where the sides will meet the end. (Mine was at 14 cm.)
Then draw a square line at the maximum height - 25 cm.
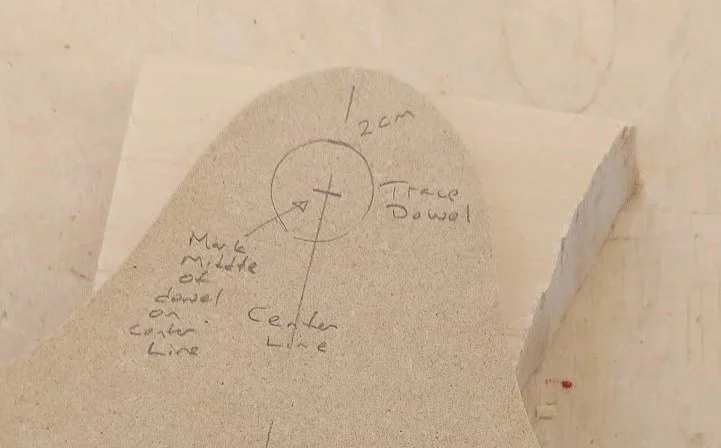
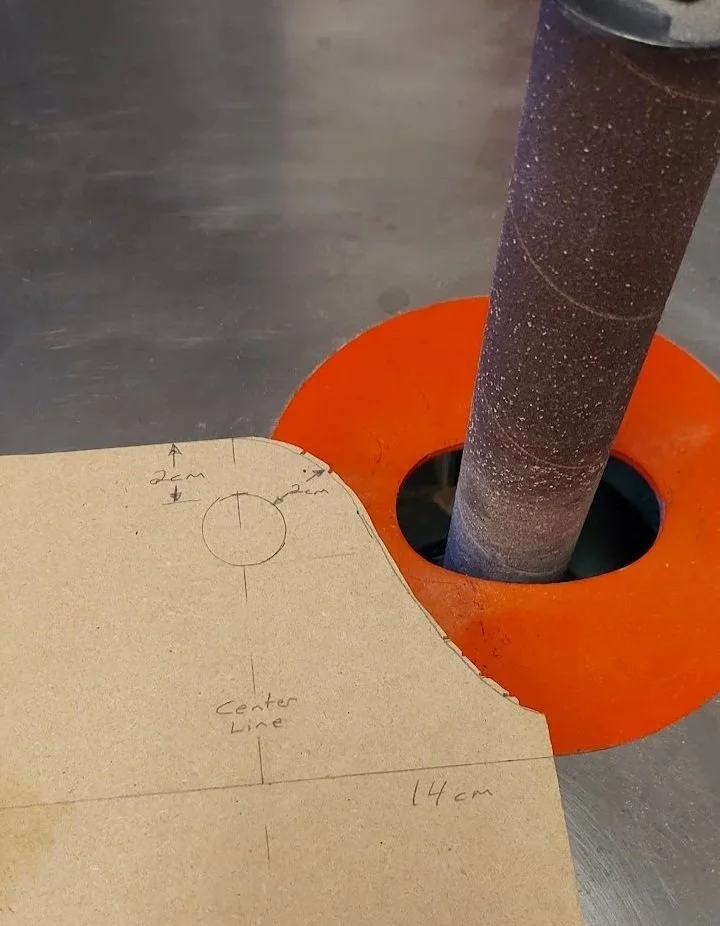
Draw a line in the center of the end (vertically) - shown as Center Line in the photo. (measure the width of your end in millimeters and divide by two)
Measure down the center line from the maximum height 2 cm. (You need 2 cm of wood around the hole for your handle for strength.)
Trace the handle dowel (draw a full circle)
Draw your design on one side making sure you to not go closer than 2 cm to the handle hole or lower than the sides. (Mine is a simple, gentle curve as it will be a tote tray for screws, nails, and bolts. I don’t want anything too fancy with notches or grooves, so it is easy to wipe off any sawdust from the ends.)


Step 3 - Two Sides
Obtain the ¼” piece of wood for the bottom from your teacher.
Repeat the same steps as above to;
measure,
mark, and
cut square the bottom to 30 cm.
Be sure to print your name on the two side pieces with a sharp pencil.
Step 4 - Two Ends
Using the two ¾” pieces cut apart in Step 1 - you will design and make the two end pieces.
You will choose what shape the ends will be based on what you plan to put into the tote tray:
Heavy tools should have a “heavy” shape with a lot of material
Light loads should have a smaller/finer shape
A decorative shape is to be used if displaying the tote tray on a shelf
The more complicated the shape, the more time required for sanding/filing.
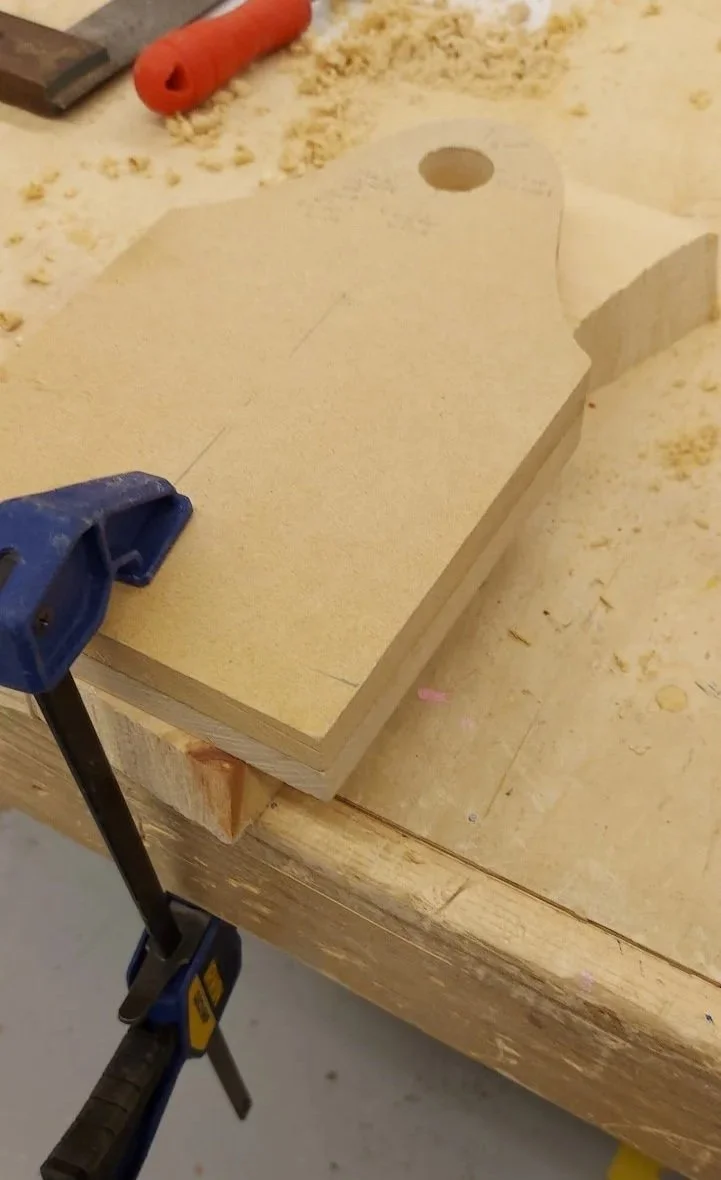
Layout the area that can not be cut on one of the ends. (You will mark in pencil directly on the wood.)
Arrange the bottom and sides in the proper position.
Show your layout to your teacher for approval to cut the shape on one side.
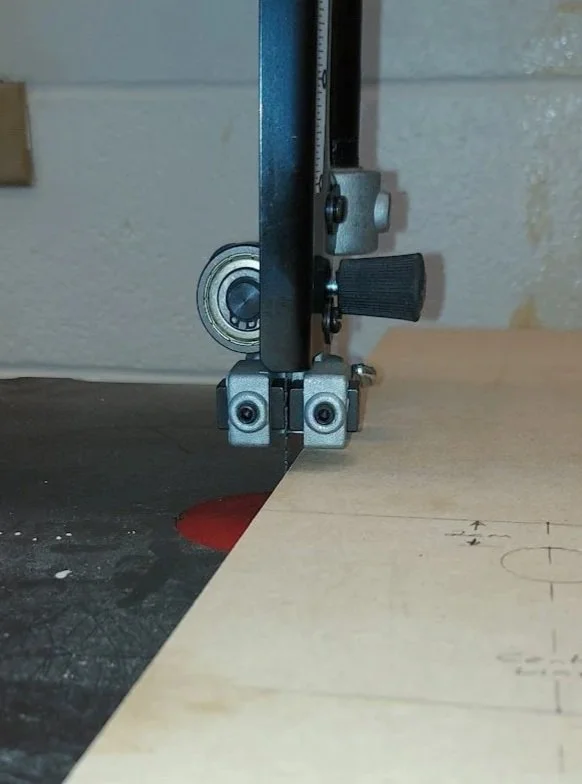
Cut the shape using a band saw (Tool LIcense) or jig saw (Tool LIcense).
You will see on the layout above I indicated where I would first make relief cuts.


You will now sand/file the one side to the shape you designed. (I have a Tool License for the spindle sander so I used that machine for the inside curves. The disc/belt sander can be used for outside curves if you have the Tool License.)
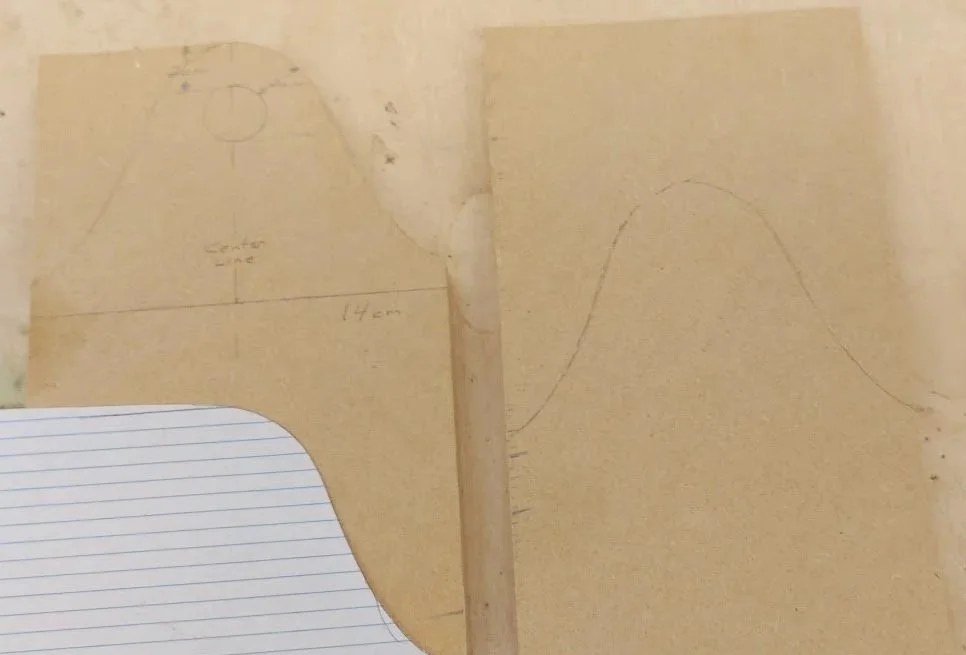
Once you have one shape, you will transfer the same shape to cut a mirror-image and the other end.
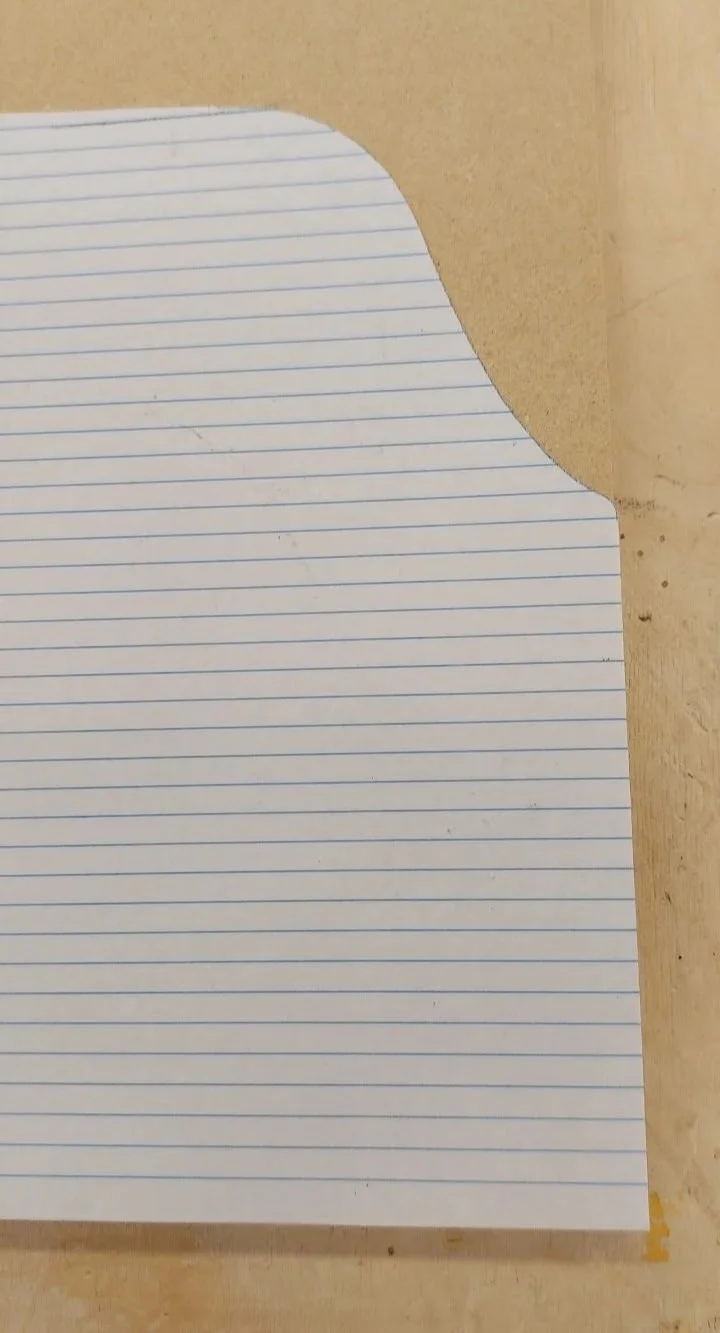
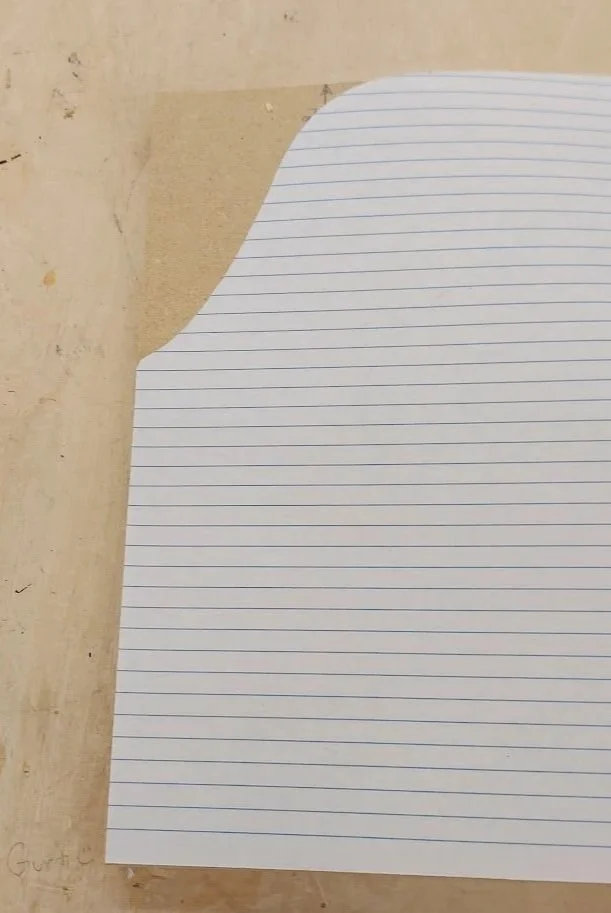
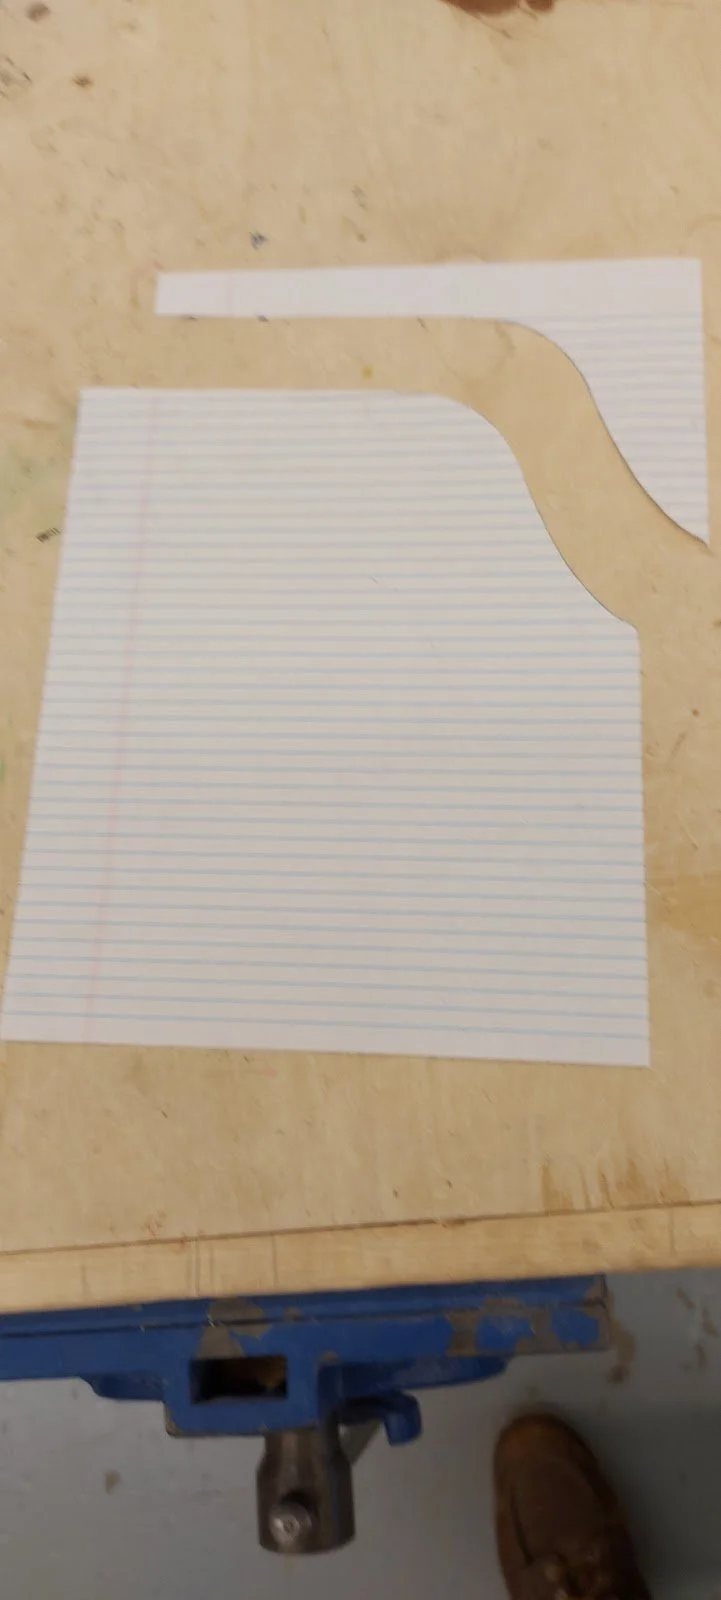
Line up a piece of paper with the bottom and side of your end piece. Trace the shape of your end onto the paper and cut out the template.

On the second end piece, you will trace the template once, and then flip the template to trace a second time. Print your name on the template as you will hand in the template with your tote tray.
Flip the template over onto the other side of the end piece and draw the same shape. (Remember to line up the edges of the paper to the side and bottom of the board.)


Cut out the shape so both end pieces look the same. You can file and sand to make the ends smooth and also to get the shapes to match.
Show your teacher to get the dowel for the handle.
Step 5 - Handle
Draw a line horizontally across the center line when the middle of the handle will be. (You can “eyeball” this, no need for precision measurement.)
Clamp your end piece to the bench with a piece of scrap wood under the future hole. (Or you could clamp to the Drill Press table with a piece of scrap wood underneath.)
Drill a hole the same diameter as your handle. (Tool License for Hand Drill or Drill Press.)
For the second end piece, align and clamp both pieces together to the bench (with scrap wood below). Drill just one millimeter into the lower (second) end piece to mark where the center of the hole in the second end.

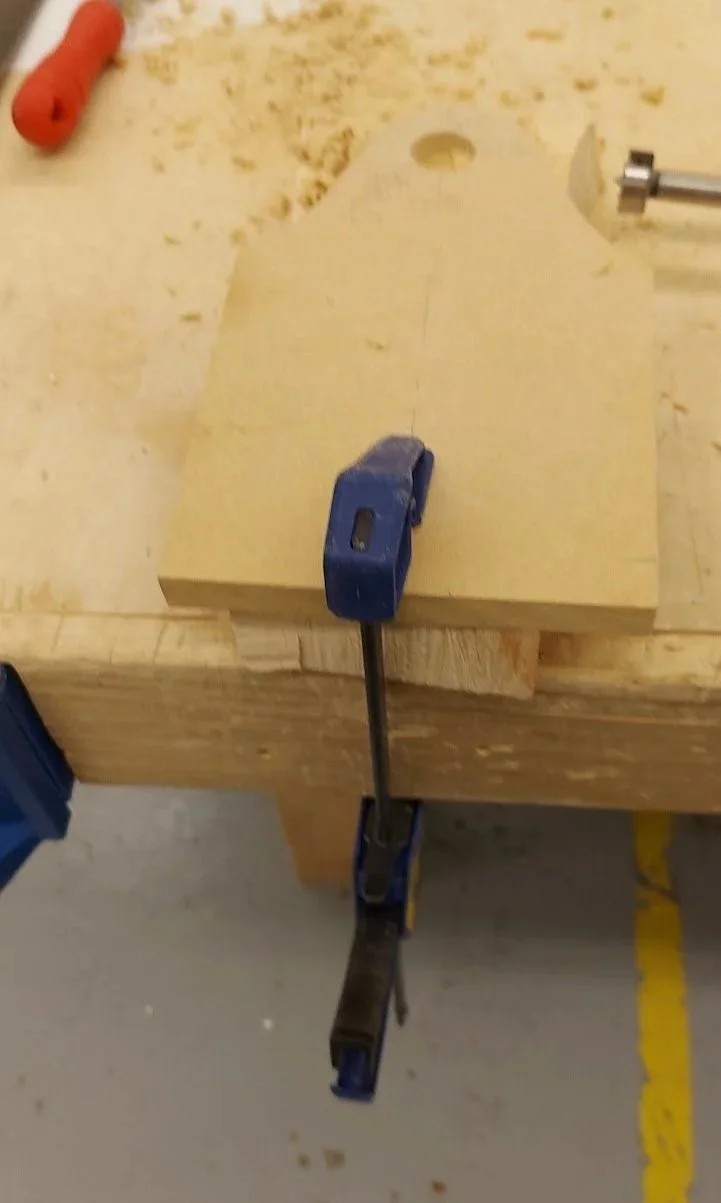
Once a mark is shown, remove the top (piece already drilled) end piece and re-clamp the undrilled piece and scrap wood to the bench and drill.
Erase and sand off all pencil markings on all pieces. (Except your name on each piece of wood.)
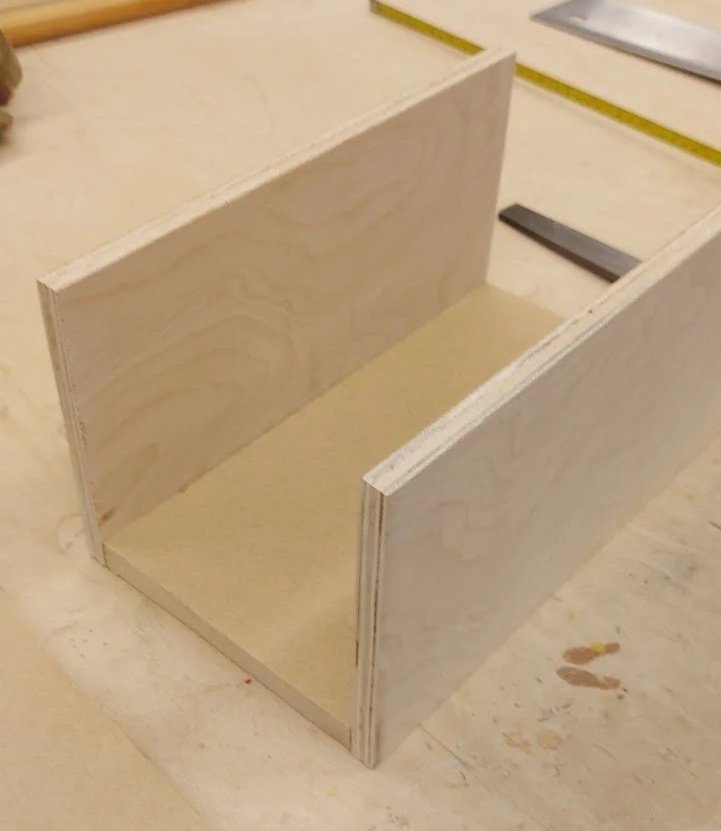
Step 6 - Pre-Assembly
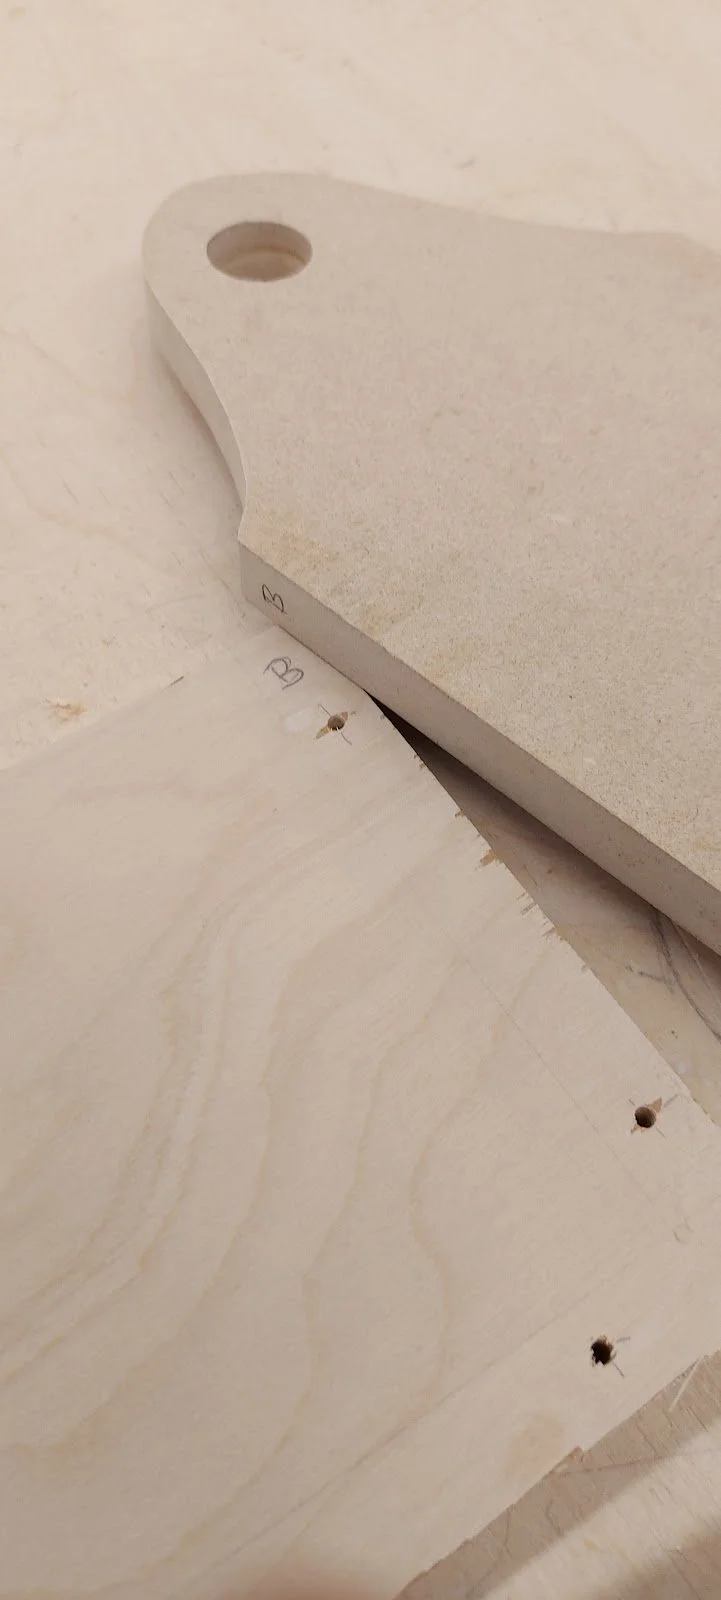
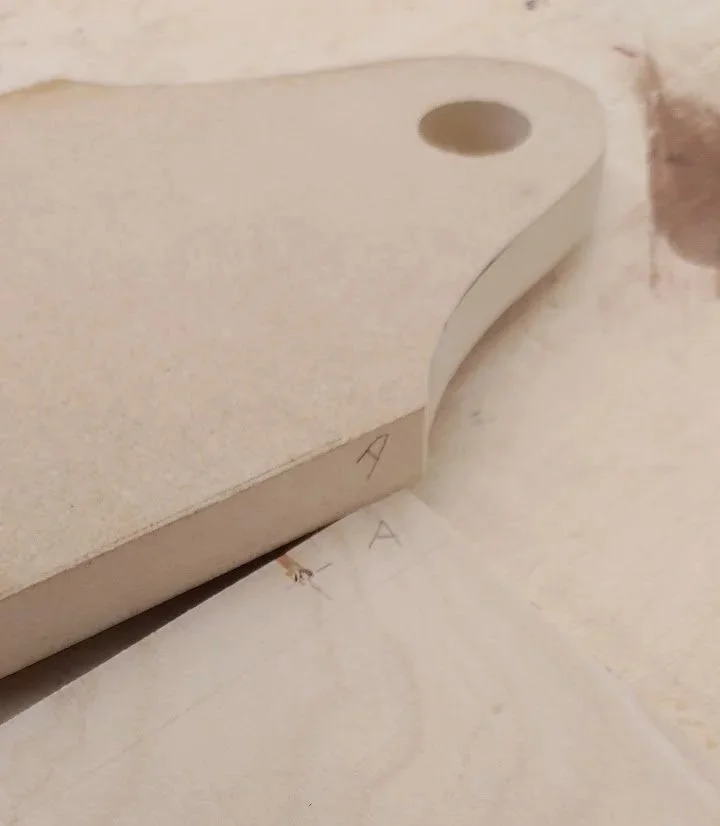
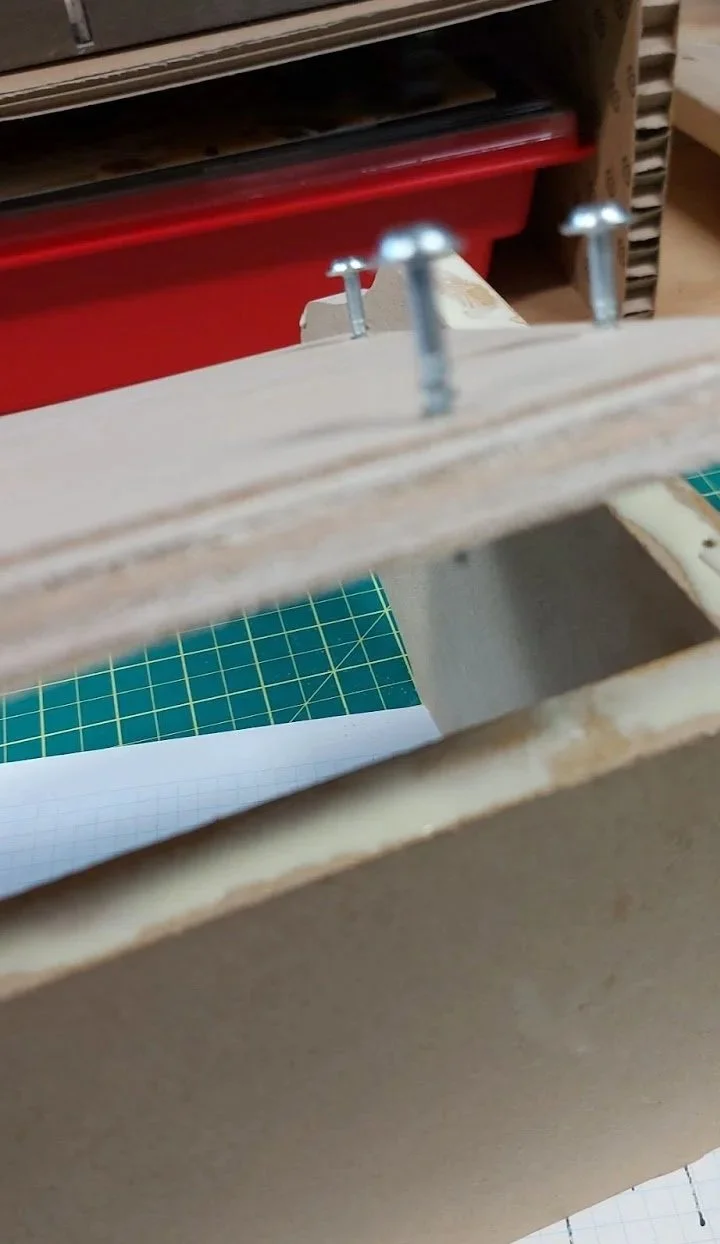
Mark the pieces so you can re-assemble the pieces in the same direction (orientation). Put A and A on the side and one end piece. B and B on the other side and end piece. C and C on the bottom and side. Continue with more letters as needed.
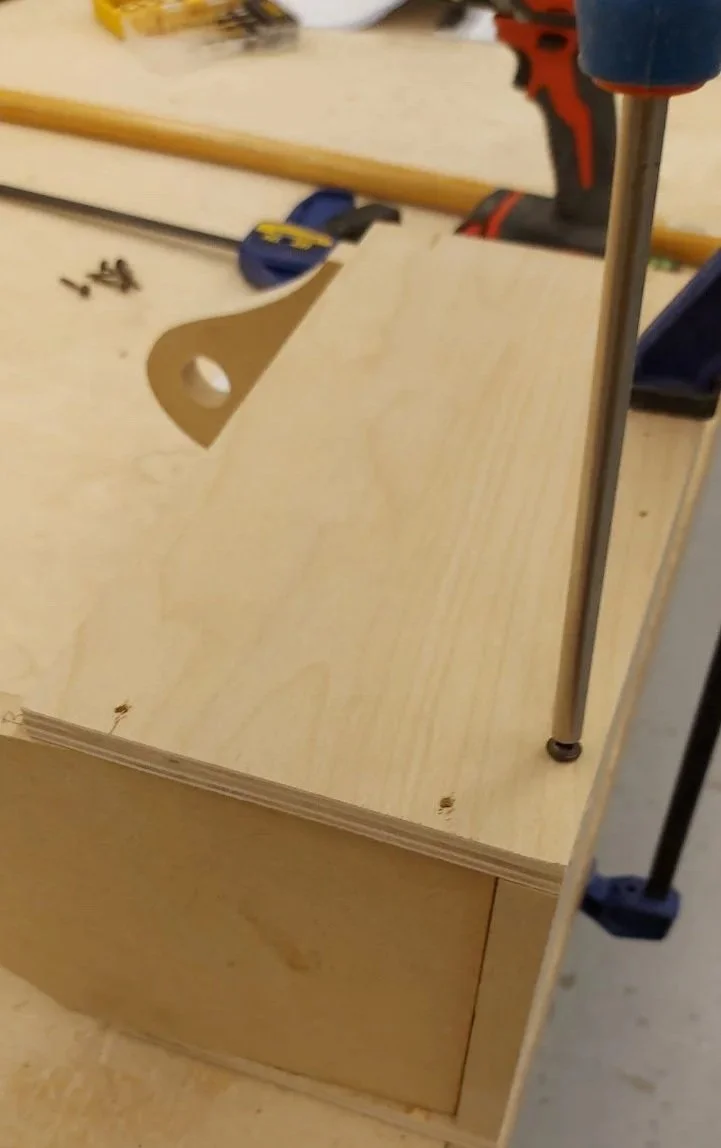
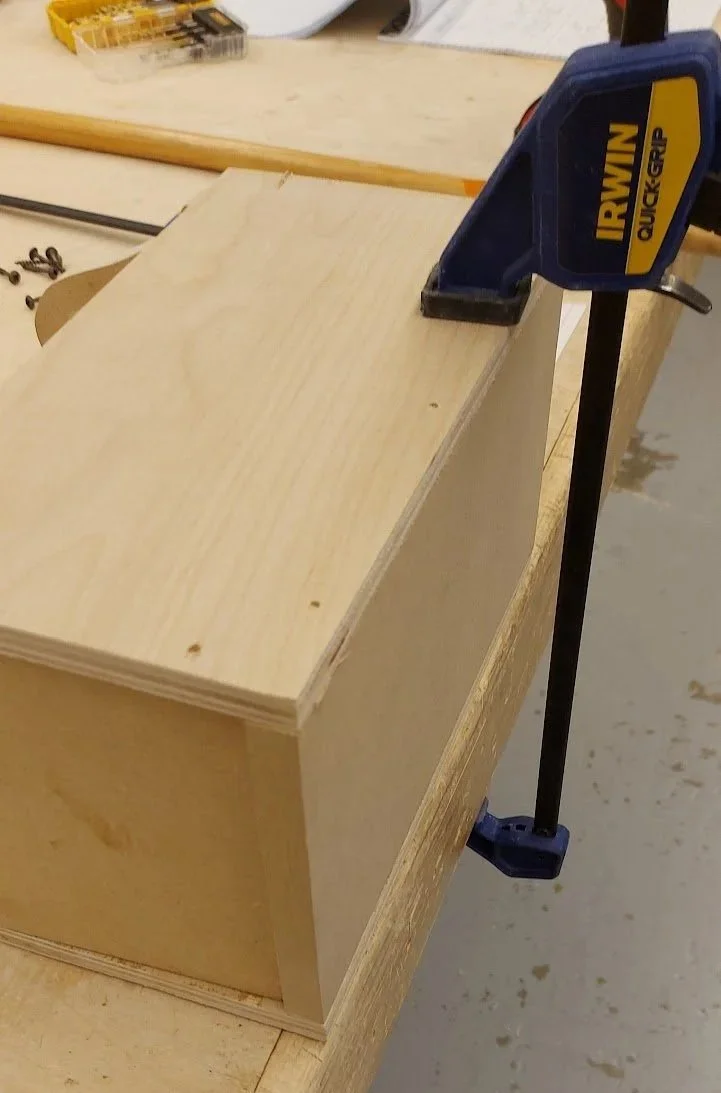
Assemble the tote tray on its side and clamped to the bench.
Drill three holes along the bottom, one in the middle and one at each end.
Then drill two holes for each end. (Do NOT remove clamps.)
Put in screws (temporarily) while clamp holds pieces together.
Turn the tote tray over, re-clamp to bench.
Drill three holes for the bottom, and two holes for each end.
Install the screws (temporarily).


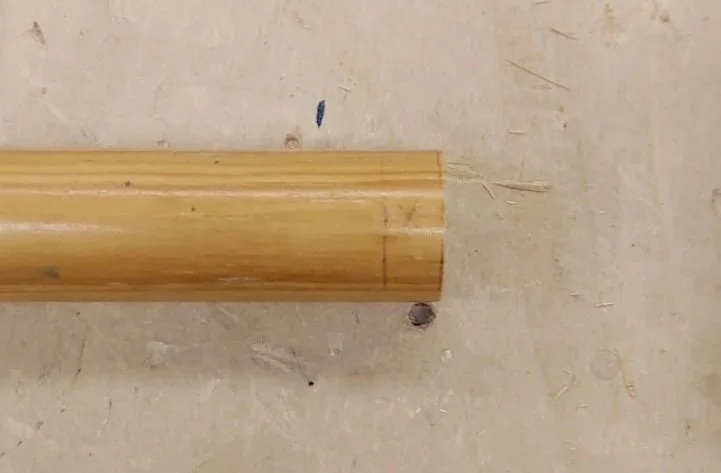
Measure the length of the dowel by inserting it into the tote tray. (If it doesn’t easily slide into the holes, hold the dowel against the tote tray to mark the length.)
Cut the dowel to length using a back-saw (or cross-cut panel saw).
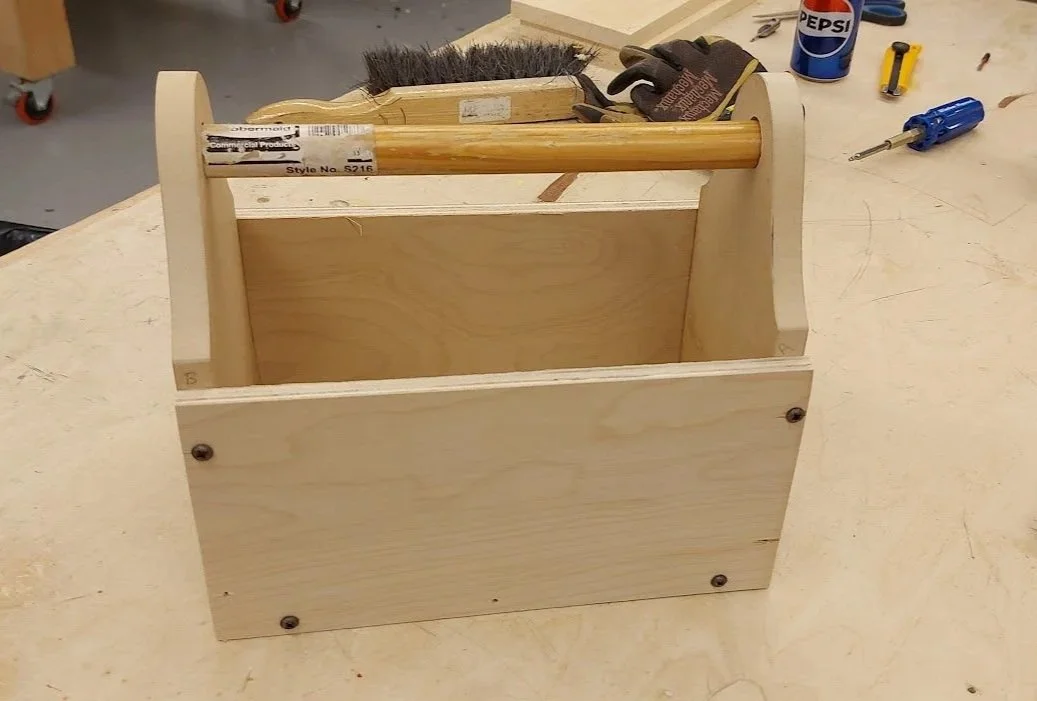

Step 7 - Final Assembly (Glue-Up)
Take the tote tray apart by removing all the screws. Double-check the letters (A-A, B-B, etc.) are still readable for reassembly.

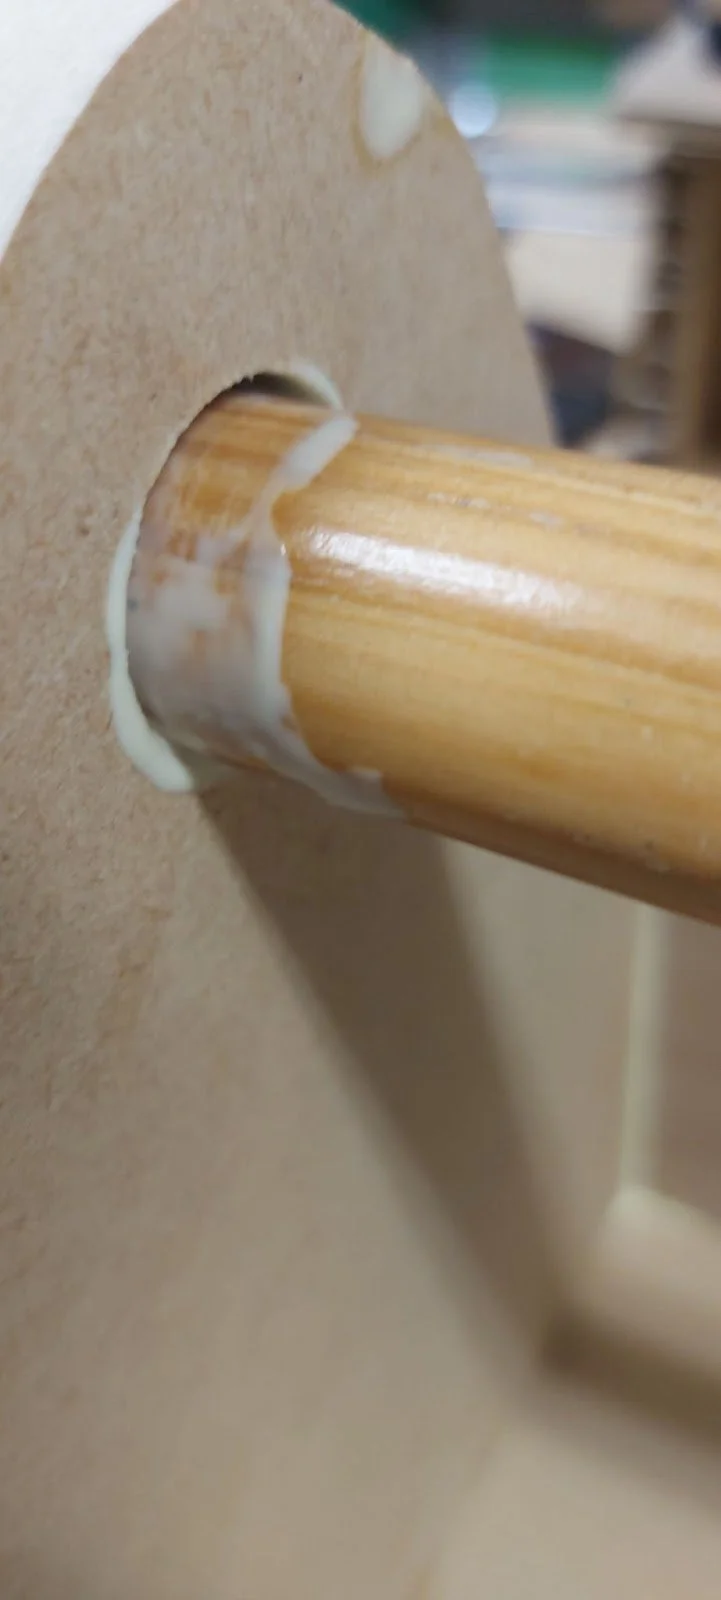
Test fit the handle into the one end - if it doesn’t fit, sand the handle until it fits. Test fit the handle in the other end. Once the handle fits in each hole it can be glued in.
Using wood glue, glue one side to the bottom and one end. Put in the screws to hold the pieces until the glue dries (in about 24 hours). Spread the glue with a popsicle stick. Wipe away any excess glue that squeezes out with a damp cloth. (If the excess glue dries, it is harder to sand off later.)


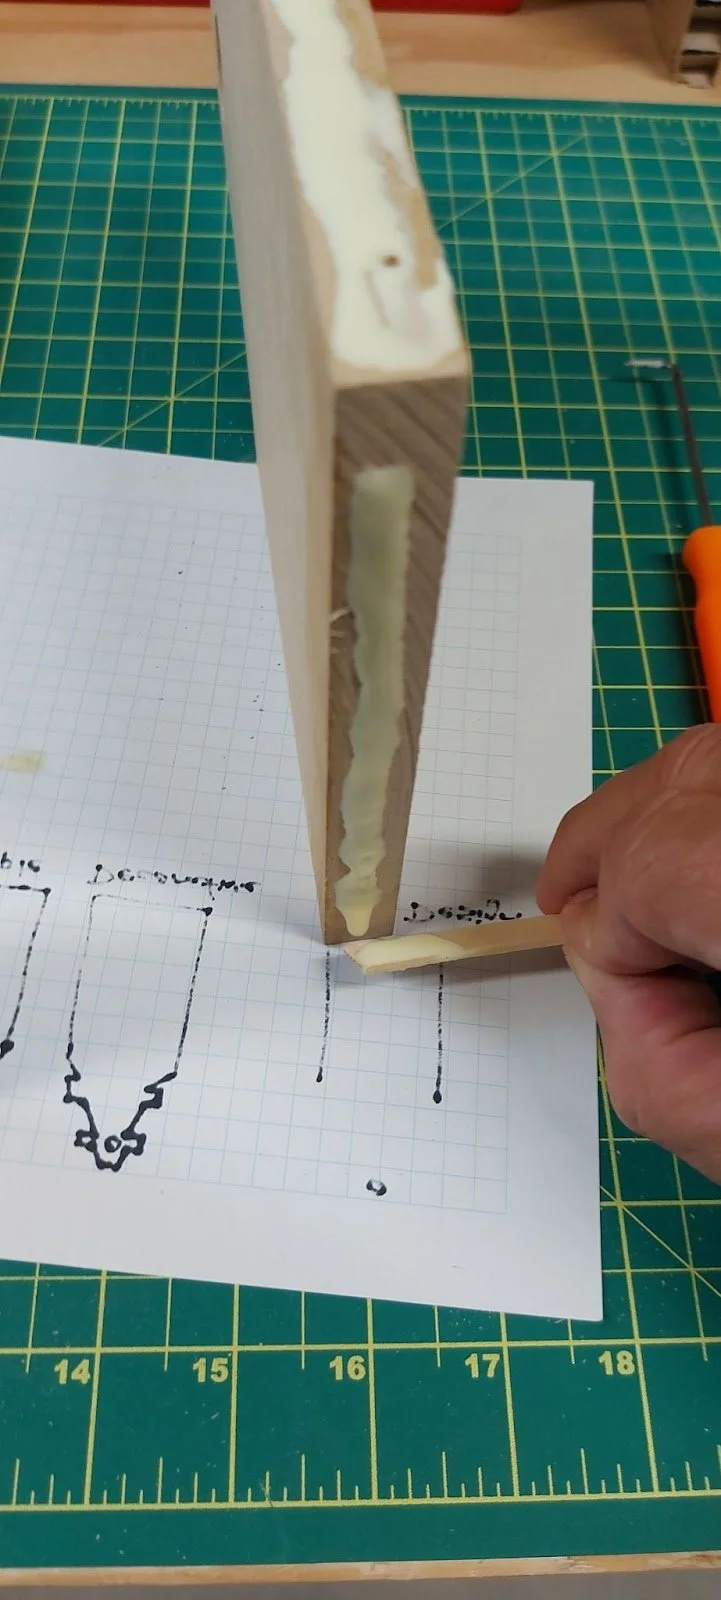
Glue the handle into the first end. Wipe away any excess glue.
Put the second end in place and glue to the side and glue the handle. Install the two screws in the side.
Flip the tote tray over and glue the other side to the bottom and two ends. Install the last screws.
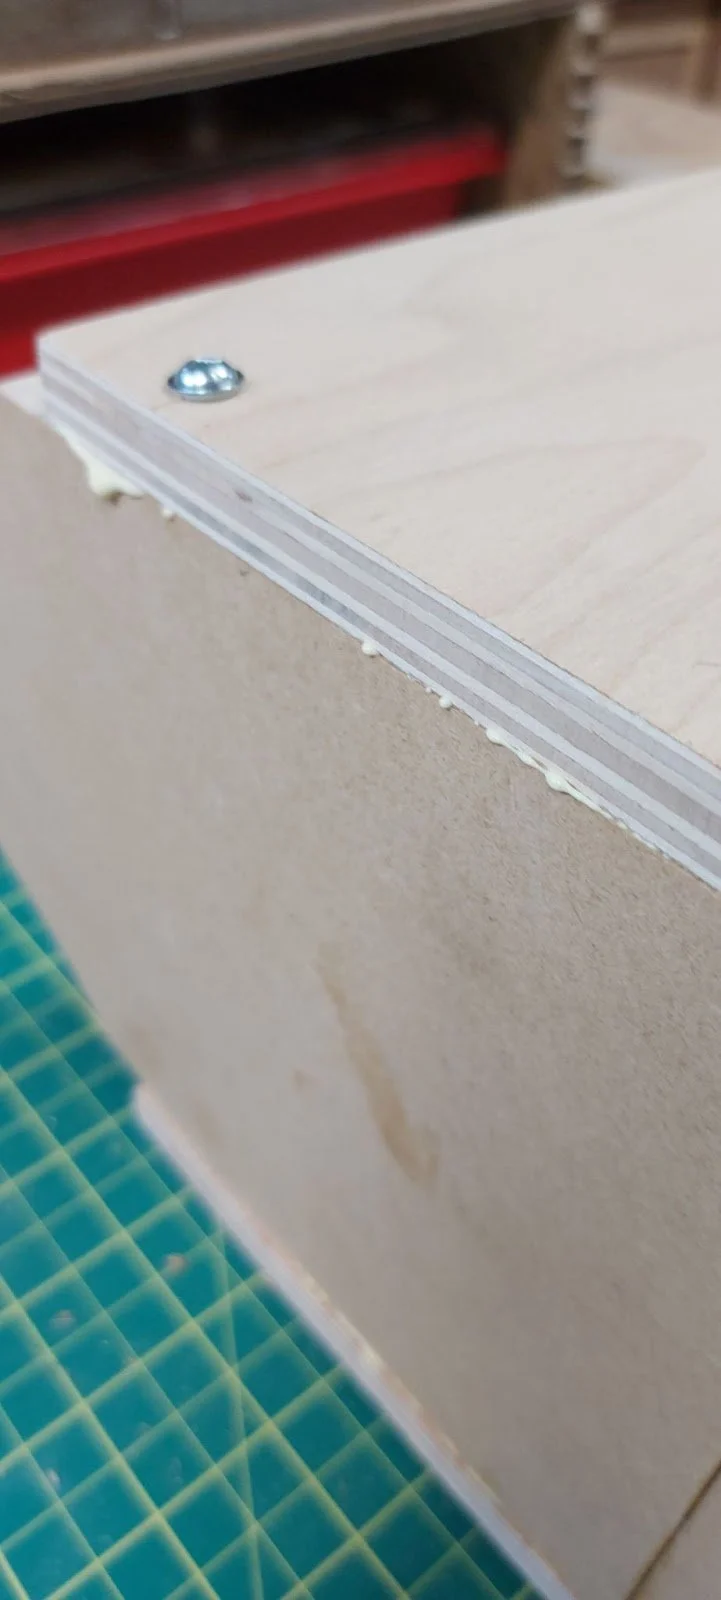

Wipe all excess glue. (If staining or oiling, the glue will show up and not let the stain/oil penetrate the wood.)
Remember to wipe the bottom too.
All screws tight, all excess glue wiped, name on bottom - bench wiped of excess glue.
Let dry for at least 24 hours.
Step 8 - Final Sanding
Now using a sanding block, slightly round all the sharp edges (inside and out) for comfort.
Always sand “with the grain” not “across the grain”.


Ensure all pencil marks are erased and sanded away.
Make sure your name is printed neatly on the bottom in pencil.
Presentation
Bring your tote tray and the template for the side to your teacher for a discussion.


-
Samples: (What to have as examples for students to see)
Finished example
Examples of different end shapes (simple angle, inside curve, outside curve, scroll, polygon)
Student Supplies: (one set per student)
(1) ¾ solid stock precut 16 cm wide and at least 50 cm long for two ends
(1) ¾ solid stock precut 16 cm wide and at least 30 cm long for the bottom
(1) ¼ plywood precut 16 cm wide and at least 60 cm long for two sides
14 round head (or pan head) wood screws (in a ziplock sandwich bag - label with student’s name) [I use 8 x 1 ¼ Particle Board Screws
Paper to make template for end
Project Storage Bag (same ziplock bag at least 8 ½” x 11” - used the whole year for each project)
Resources: (Tools and Equipment)
Cross-cut (fine tooth) panel saw or back saw
Drill
Drill bit same size as wooden dowel
Drill bit for screws
Layout tools (pencil, straight edge, measuring tape, square)
Sanding block with 180 grit sandpaper
Loose sandpaper (for inside curves)
Popsicle stick (to spread glue)
Wood glue
Files (assorted) and File Card (for cleaning file)
Band Saw (Tool License)
Drill (Tool License)
Drill Press, optional (Tool License)
Spindle Sander, optional (Tool License)
Disc/Belt Sander, optional (Tool License)
Other Information for Teacher:
Wood pieces are given to the student as needed. (Not all at once to reduce waste and ease storage.)
The first board cut square is the piece that makes the two ends. It does not actually need to be square, but gives practice to the student and cuts the longest board in half for easier storage in the student project cupboard.
-
Link here to specific safety for this “shop”
-
Link here to General Safety page